
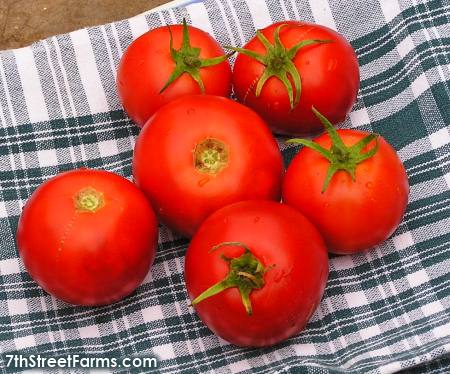
These bright red beauties are full of flavor and lycopene, an antioxidant that may counter free radicals.
Growing Tomatoes: From Seed to Harvest

At 7th Street Farms the Tomato Season begins in early March, when we sow our Health Kick seeds near the windowsill, placing them in individual compartments under a moist 1/4 inch of sphagnum peat moss. A layer of Plastic Wrap goes on top--then a few sheets of newspaper, to provide a little insulation from the direct rays of the sun, shining in from the southern sky.
We then make sure to look in on them from day to day, keeping the seed trays moist as needed. Within 7 days almost all the seeds will have sprouted, and it will be time to place them under flourescent lamps. We do our best to keep the lamps approximately 1-2 inches above the seedlings, adjusting the lamps as growth progresses. Our plants get about 16 hours of light a day.
Once the second set of leaves appear and are a good size (the whole plant no more than 3 inches tall), it's time for repotting. We use empty plastic yogurt or cottage cheese containers (32 oz.) "poked" with adequate drainage holes. Our media is a standard potting mix like "Supersoil" --which does the job just fine.
To re-pot our seedlings, we clip off all but the top leaves, and then bury the seedlings up to their "necks" with just the leaves sticking out of the soil. The part of the stem covered by soil will develop roots--the beginings of a large root system. The newly potted seedlings then go back under the lamps for another few weeks.
As the first week of April passes the plants should be ready to go outside. We hold off water and place them in a sheltered spot, out of direct sunlight to "harden" them off--get them used to the cooler outside temps, the shifting breezes, and the brighter light of the sun. We gradually let them see more direct sunlight, until by the third week of April, they are getting about 7 hours of direct sun a day. It's time to go out into the Tomato Bed.
Removing them from the plastic containers, we then bury the plant up to its upper set of leaves, the intention being to get those roots growing from the burried stem once again--more roots means more ability to grow. The planting hole has already been prepared with about a quarter cup of a good 5-10-10 fertilizer placed at the bottom with a layer of soil on top to prevent the delicate roots from getting burned.
We space the plants about 2 feet apart in rows 3 feet apart, and install a custom tomato cage which is supported by two lengths of 1/2 in. rebar, 180 degrees out from each other. We use Tomato Wire from a local hardware store and make our cages about 16 inches in diameter. The end result is 48 inches tall, and several of our plants actually grow higher than this by season's end.
It's best not to over-water tomatoes, nor to get water on the leaves. To do so will encourage fungal diseases. It's also a good idea not to splash soil up onto the leaves--just in case some infernal soil disease is lurking below. Drip irrigation is a good idea here--as well as some mulch liberally placed around the stem. We've found that clipping off low hanging leaves is also a good idea--only the original stem should touch dirt where it enters the ground.
2013 Tomato Recap
And the loser is . . .
Well...there really are no losers here. And there are certainly some tomatoes which we really liked for specific reasons. There were, however, two varieties we grew this year which we found to be unsuitable for further growing at 7th Street Farms. They were...
Crimson Sprinter
We initially had high hopes for this variety from Prarie Road Organic Seed, but Sprinter did not do well--probably due to the cooler summer we had this year. They also seemed to be very susceptible to a disease of some sort. By mid-summer all the plants were looking pretty ragged. The fruit they set were generally small (large golf ball), and most were nicely round.
Compared to the sweet, paste-type tomatoes we usually grow here at 7th Street, Sprinter was decidedly more acid. They performed well as a salad tomato, but nothing to write home about (hmmm...is that what I'm doing???).
Some atractive, albeit small, Crimson Sprinters from our garden.
Italian Heirloom
This tomato from Seed Savers Exchange won their 2012 taste test competition. While we were impressed with the size of some of the earliest fruit set, the taste was really not what we expected. As Randy Jackson would say, "It was just alright for me, Dog." The few fruit that this tall and leggy plant did produce added their fleeting glory to several salads, and for that we are thankful.

Large and meaty Italian Heirlooms--a fair addition to a salad or tomato sandwich.
Best Taste? Amish Paste
Amish Paste
Amish Paste performed well on many levels. Their productive vines grew over 6 feet tall, studded with large roma-type fruit which were simply a delight to the tastebuds: sweet and tomatoey, the hands-down winner of our taste test this year. They peel easily for processing, and we're convinced that they added a certain sweet complexity to our salsa and sauces this year. We look forward to growing them again next year.

Large, meaty and tasty--these freshly harvested Amish Paste Toms glow in the morning sun.
Honorable Mention: Big Mama
Big Mama
This hybrid from Burpee has earned a special place alongside our Health Kick tomatoes as a prolific canner. Where they come short in the amount of fruit set (compared to the 'Kickers) they more than make up for in fruit size. These large Romas shed their peel easily making the canning process go that much smoother. We can't imagine not growing Big Mamas again next year.

Burpee's Big Mamas are a large and prolific canning tomato--they don't taste bad either!